
InDesign Translation Services
Professional InDesign translation with in-house multilingual DTP. We work with IDML files using MemoQ, delivering terminology-consistent, print-ready translated documents in your original format. ISO 17100:2015 certified.
Whether you are translating a product brochure, technical manual, user guide, or packaging, we handle the full process: translation, typesetting, and final layout check. The translated file comes back ready to use, with no additional DTP work needed on your side.
120+ languages. 3,000+ specialist translators. Get a free quote.
The Ultimate Guide to Handling InDesign Translation Projects
What is an InDesign file and what are its uses for translation purposes
Adobe InDesign is a professional desktop publishing software program used primarily to create sophisticated documents and digital publications such as magazines, newspapers, posters and books.
With Adobe InDesign, users can create high-quality layouts with text, graphics and images for both print and digital media. InDesign file also provides features such as page transitions, automated page numbers and master pages that make it easier to design complex documents quickly.
Additionally, users have the ability to export their projects in various file formats for future use on websites or other applications.
Because of its widespread use and popularity, many publications, brochures, documents and user manuals are created in InDesign for global audiences. These InDesign documents need to be translated, and in this post, we’ll discuss how to best translate InDesign files.
The common but incorrect InDesign translation process
Before we navigate how to correctly manage the translation process of an InDesign file, let’s first look at the common but very inefficient processes first.
Many clients and content creators do not know the ins and outs of translation processes and translation tools, so they approach the InDesign file translation projects in a very basic and simplistic way. They don’t realise this is very inefficient and there are smoother ways to get their document translated.
The copy-and-paste approach
1. What is the copy-and-paste approach to translate InDesign files?
The copy-and-paste approach to translation is a method of translating text from one source file format to another in preparation for translators to do their work.
Once the source text is extracted into a Microsoft Word or Excel and translated file is ready it needs to be pasted back into the InDesign document.
The last stage is to review and clean up the formatting. This is important because the volume of the words and characters changes during the translation process.
2. Why is the copy-and-paste approach not recommended?
There are several reasons why the copy-and-paste approach is not recommended for the translation of an InDesign file.
First, it can lead to omissions in the translation if the text is not copied correctly. If a piece of text is not passed on to the translators, it will only be discovered as missing during the stage of pasting the translation back into the InDesign file and will need to be sent out to translators again. This adds unnecessary delays to the final review of the project.
Second, it is very easy to introduce errors in the translation during copying and pasting. If the person in charge of this process does not speak the target language and doesn’t understand the text in the translated file, they may easily make an error by missing an accent or not following the correct punctuation rules. This is especially important for languages such as Chinese, Japanese or Korean where all the text used is in non-Latin characters.
Third, this approach is very labour-intensive and time-consuming, so it’s not a very cost-effective way to handle InDesign files.
The best export to easily translate InDesign files
In order to easily translate an Adobe InDesign file efficiently, the best format to export is IDML, which stands for InDesign Markup Language.
As standard, InDesign documents will be stored in the INDD file format developed by Adobe. Alternatively, an IDML file is an open-source indesign markup language format that reveals the contents of InDesign files in plain text through coding and tags. Your translation partner can work with the IDML file format, which they can then input into their own advanced tools such as translation memory software MemoQ.
The IDML document format yields significantly smaller files than the INDD since it does not contain any images or graphics. This compact size also makes it easier to share an IDML file. Although IDML may lead to some slight formatting issues upon reimporting into InDesign, such as text reflow, these are usually minor inconveniences.
However, before you even export the InDesign file, there are many aspects of the design that should be considered to improve the translation process.
How to setup formatting to avoid issues during the InDesign translation projects
Are you planning ahead for translations?
It’s a top priority for creating effective digital content with InDesign files.
Fortunately, your InDesign translation project doesn’t have to be a pain. Establishing formatting protocols early in the process helps streamline translation later on and ensures translation quality so the end product not only looks great but is comprehensible no matter which language it’s translated into!
How to format an InDesign document with translation in mind?
When the InDesign file is sent for translation, the translation memory software, such as MemoQ, will create text segments. These segments are tagged before translation so they can be smoothly re-imported after the translation is done.
You need to understand that this segmentation will take place and set up the source InDesign file that will create comprehensible and efficient text segments.
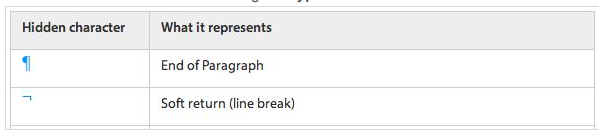
Use soft return instead of hard return to format the text blocks
If you want to section off your text with a clear break, choose the option a line break this is called soft return. If you use a hard return (a paragraph mark) instead, you will create issues with segmentation for your translation partner.
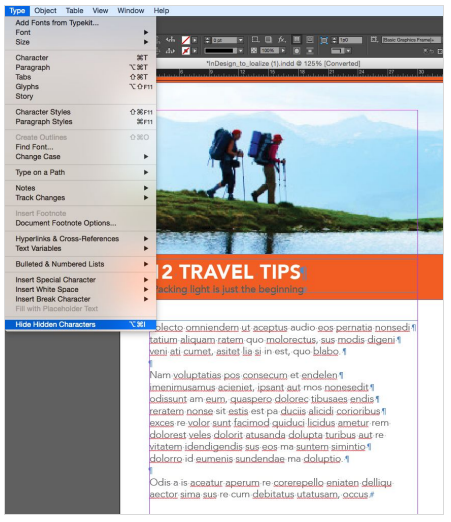
For viewing all hidden characters, simply navigate to Type > Show Hidden Characters and toggle it on.
If you’re looking for further information on invisible characters and on hidden characters in InDesign, then check out Adobe’s page.
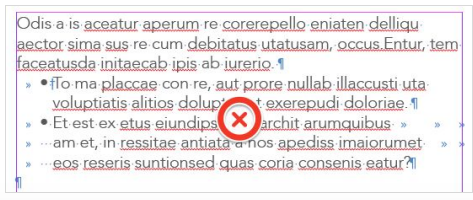
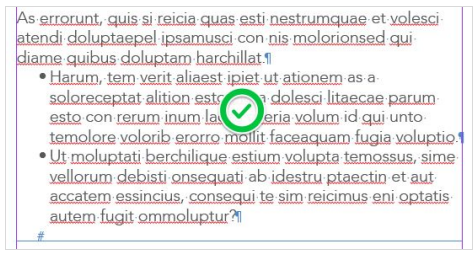
In the below case sample, a paragraph mark was added to the close of every line. Whenever a hard return is used, a new segment of text will be created in translation tools. This is not desirable as it could lead to the translator being confronted with unfinished or out-of-order pieces of sentences. Due to different sentence structures in foreign languages, this breaking up of sentences should be avoided as it might actually create errors in the target language. By utilizing a soft return on your content, you’ll be able to maintain the same design layout while giving translators’ tools an actual visual representation of full sentences and paragraphs.
Alignment best practices
Structuring lines of text with tabs and spaces in InDesign file is an all-too-frequent mistake. Such an alignment approach will create segmentation issues in InDesign translation projects and can result in an arduous task for translators and DTP teams.
To perfectly align your text for translation opt for Lists with either bullet points or numbered, Paragraph Styles with Left Indent and Special Characters such as Indent to Here.
Incorrect alignment:
Correct alignment ideal for translation:
Use Text Layers instead of text from Linked Graphics
When exporting in IDML format, any text belonging to a linked graphic is excluded. Consequently, it is essential to localise all text and graphics used in your visuals in addition to the text exported as IDML file. Separate localisation of all graphics with text will add extra time and cost to the project.
An effective solution to this issue is to apply layers. InDesign allows for effortless layering, so instead of combining your graphics with the text, create a separate text box that sits atop your graphic. The text from layers is then exported as part of the IDML file and is translated without the need for extra typesetting and DTP time.
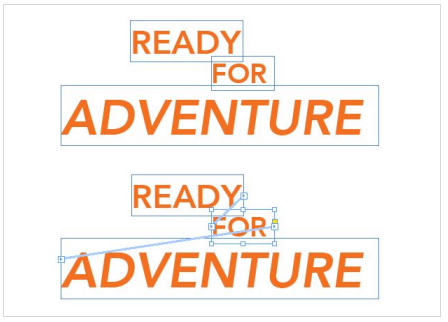
Text frames threading
To unify various text frames into one cohesive sentence, consider “threading” them. This threading approach makes it easy for parsing multiple strings as one text segment in correct order and it eliminates the hassle of dealing with excessive individual strings that are difficult to translate individually. Threading ensures that the text translated into other languages is displayed as in the original document.
To learn more about arranging text frames in InDesign, click here.
Consider Style Sheets
Utilizing Character and Paragraph styles is an effective way to ensure a consistent format throughout the layout, as well as save time and formatting during the translation. Utilizing manual formatting overrides can often be a fruitless effort as it is likely it might be lost in the translation tools, resulting in lengthy post-translation format layout cleanup.
Moreover, styles can be applied to any new file quickly and efficiently – a major plus when creating many documents with similar layouts. Not only will it save you time but it’ll also help lower costs for your projects.
Use InDesign Tables Package
While InDesign has a superb tables package, many graphic designers will often resort to manually creating tables by delineating text frames with box and line rules. The manual approach can again cause issues when it comes to InDesign translation. It is better to use the InDesign tables package.
Utilizing the tables package, you’ll never have to worry about manually adjusting cell/container sizes or rules when text expands during translation; it does that automatically! On the other hand with manual frames, they must be adjusted to their correct size manually.
Elements grouping before you translate InDesign file
When a cluster of inline components (graphics and/or text boxes) must remain in fixed locations relative to each other, it’s best practice to group objects together so that they remain in their correct relative position when translated text expands.
Leave extra space for text expansion
Did you know that during translation the text volume changes? When translating from English into German, French or Italian the volume can increase by a whopping 35%.
One of the most difficult aspects of designing InDesign documents for translation is structuring a page layout that will leave enough room around text elements to account for potential post-translation text expansion.
Languages with right-to-left text
For Eastern languages like Hebrew or Arabic, which are written from right-to-left, Your DTP team will be necessary to adjust your translated document for right-alignment and a right-to-left layout. Unfortunately, this often involves a complex “document reconstruction”, but there’s no easy way around it.
Best fonts for Korean, Japanese and Chinese
Despite the varying font selections across operating systems, it is important that your desktop publishing team utilize fonts with varying weights (light, regular, bold & extra bold) as well as serif/sans-serif compatible font sets for Korean, Japanese and Chinese.
Here are our top selections for general purposes in these languages:
For Korean translation use:
Serif: Nanum Myungjo/Apple Myungjo
Sans-serif: Nanum Gothic/Apple Gothic
For Simplified Chinese translation use (fonts with the “SC” suffix are an excellent choice):
Serif: SimSun/Kaiti SC/Songti SC/
Sans-serif: SimHei/Heiti SC
For Traditional Chinese translation use (fonts with “TC” suffix):
Serif: Songti TC
Sans-serif: Heiti TC
For Japanese translation use:
Serif: Kozuka Mincho
Sans-serif: Kozuka Gothic
For Korean translation use:
Serif: Nanum Myungjo/Apple Myungjo
Sans-serif: Nanum Gothic/Apple Gothic
Collaborating with translators and designers for successful InDesign translation
Collaboration is the cornerstone of a successful InDesign translation project. Establishing clear communication channels and defining roles and responsibilities are essential steps. Translators need to be well-acquainted with the InDesign file and its contents, while designers should understand the nuances of the translation process and its specific requirements.
To ensure a smooth collaboration, consider these best practices:
- Provide a Clear Brief: Give translators a comprehensive brief that includes the project context, target audience, and target language. This helps them understand the nuances and expectations.
- Centralized Communication: Use a centralized platform for communication and file sharing, such as a project management tool or a cloud-based storage service. This ensures everyone is on the same page.
- Defined Workflow and Timeline: Establish a clear workflow and timeline, including deadlines and milestones. This helps in tracking progress and ensuring timely delivery.
- Open Communication: Encourage open communication and feedback between translators and designers. This ensures that any issues or concerns are addressed promptly, leading to a more accurate and efficient translation process.
By fostering effective collaboration between translators and designers, you can ensure that your InDesign translation project is completed efficiently and accurately.
Managing InDesign Translation Projects
Managing an InDesign translation project requires meticulous planning, organization, and execution. Here are some tips to help you manage your project successfully:
- Define Project Scope and Objectives: Clearly outline the project scope, including the languages, file formats, and deadlines. This sets the foundation for the entire project.
- Create a Project Plan and Timeline: Develop a detailed project plan with milestones (initial translation, proofreading, back translation, typesetting, image formatting, etc.) and deadlines. This helps in tracking progress and ensuring that the project stays on schedule.
- Assign Tasks and Responsibilities: Allocate specific tasks and responsibilities to team members, including translators, designers, and project managers. This ensures that everyone knows their role and what is expected of them.
- Establish a Quality Control Process: Implement a quality control process to ensure that the translated files meet the required standards. This includes proofreading, editing, and final reviews.
- Monitor Progress: Regularly monitor progress and track any changes to the project scope or timeline. This helps in identifying potential issues early and making necessary adjustments.
By following these tips, you can ensure that your InDesign translation project is managed efficiently and effectively.
Dealing with document updates and content changes smoothly
Document updates and content changes can pose significant challenges in an InDesign translation project. Here are some tips to help you manage these changes smoothly:
- Version Control System: Use a version control system to track changes to the original file and the translated files. This helps in maintaining consistency and avoiding confusion.
- Clear Update Process: Establish a clear process for updating the translated files when changes are made to the original file. This ensures that all changes are accurately reflected in the translated versions.
- Translation Memory Tool: Utilize a translation memory tool to store and reuse previously translated content. This not only saves time but also ensures consistency across different versions of the document.
- Cloud-Based Collaboration: Consider using a cloud-based collaboration platform to facilitate communication and file sharing between team members. This makes it easier to manage updates and changes in real-time.
By following these tips, you can ensure that document updates and content changes are managed efficiently and effectively in your InDesign translation project.
InDesign Translation Software and Tools
There are numerous software tools and plugins available to assist with InDesign translation. Here are some options to consider:
- Adobe InDesign’s Built-In Features: Adobe InDesign offers built-in translation features, such as the “Export for Translation” option, which simplifies the translation process.
- Third-Party Plugins: Plugins like Redokun or Pairaphrase integrate seamlessly with InDesign and provide additional translation features, enhancing the overall workflow.
- Cloud-Based Translation Platforms: Platforms like Smartling or MemoQ support InDesign file formats and offer collaboration tools, making it easier to manage translation projects.
- Computer-Assisted Translation (CAT) Tools: Tools like SDL Trados or MemoQ provide translation memory and terminology management features, ensuring consistency and efficiency.
When selecting an InDesign translation software or tool, consider the following factors:
- Compatibility: Ensure the tool is compatible with your InDesign file format and version.
- Ease of Use: Look for a user-friendly interface that simplifies the translation process.
- Features and Functionality: Consider features like translation memory and terminology management, which can significantly enhance the quality and efficiency of your translations.
- Integration: Check if the tool integrates with other platforms, such as project management software or cloud-based storage services.
By choosing the right InDesign translation software or tool, you can streamline your translation process and improve the quality of your translated files.
Summary
Using a professional translation service is the most accurate way to have your InDesign files translated. You might be tempted to use your internal DTP team or even an external agency that designed your InDesign documents in the first place, but if they don’t have experience in handling multilingual InDesign files, they will not be the most efficient with them.
Global LTS approach to InDesign translation
We are flexible and will work with you in a way that suits your internal processes. We’ll happily offer guidance and best practices on preparing the InDesign document and structuring text for translation.
The best approach is to provide us with the full InDesign file package including all links. Our professional multilingual DTP team will review the files and prepare what needs to be translated. If there is any text in graphics, we’ll liaise with you on the best approach. At this stage, we’ll also confirm if you want to localise your logos, slogans, addresses, etc.
We will also review the InDesign document formatting to ensure the best possible segmentation for translation and will create a small-size IDML file ideally prepped for translation.
The translation itself is done by professional translators within MemoQ which creates translation memories, ensures terminology consistency and maintains all formatting tags unchanged. We never use machine translation.
After the final check of the translation is done, the DTP team import the IDML file back into the InDesign document and cleans up the project with final adjustments before creating a ready-for-print PDF format and final translated InDesign file.
Reach out today and let us bring your ideas to life with complete confidence – backed by our commitment to outstanding service, great results, and of course amazing customer support.